Wednesday, December 30, 2015

Boy Vest Instructions and Pattern Support


Finally Boy Vest is released!


First, download Instructions  here

Notes of pattern support for this project:
Boy Vest features an interesting construction. Vest is knit in the round from bottom up, and it is worked in merino wool with DK weight yarn. Seamed only in shoulders. Color work is made with scrap contrasted yarn colors. Very easy and fast to make.

Notions that will be needed:


Setting up rows for both sides back and front:
Use a stitch marker to divide circumference of body into two equal half.
Make sure before work front, wind a second ball of main color because both fronts are knitted at same time from the right to left one.


Placing stitches for underarm in scrap yarn:
After first stitch marker, which it has been used since the project started on hem ribbing, knit to 2 (3, 2, 3, 2, 3) stitches before next marker that had been just located to divide body half circumference.  Place the next 4 (6, 4, 6, 4, 6) stitches in a scrap yarn. These stitches include the (2,3,2,3,2,3) stitches before marker, and after stitch marker; slip marker in between stitches. 
 
Working both fronts:
With the circular needle, knit 24 (26, 27, 31, 32, 35) stitches. Place the next 2 (1, 2, 1, 1, 1) center stitches in a holder.
With same circular needle, Knit the other side of front 24 (26, 27, 31, 32, 35) stitches, and place next 4 (6, 4, 6, 4, 6) stitches on scrap yarn, and slip marker again in between them.
Let the next cross back stitches held on the scrap yarn. They will be worked after front is done.

Ribbing:
Neckline or armhole number of stitches in this case should be no divisible by 4 because of pattern (k2,p2). It is needed a mirror for sides stitches of V. It means. In the case of neckline, if starting to purl 2  stitches on right side of the cross back stitches for neck, and if working with 16 stitches, necessarily will be needed 2 more purl stitches at the end of that row in order to have equal amount of k2, p2 stitches facing for V side by side of center stitch.


Double decrease:
Work a simple decrease making a Sk2p (slip the center stitch and then the stitch before together knit wise, knit the next stitch, then pass the two slipped stitches over the next stitch), this creates the raised stitch in the center, continue ribbing pattern.


Binding Off in Ribbing Pattern:
Time to remove the project from the needles you have been knitting with. 
 
Knit stitches: bind off knit wise
Purl stitches: bind off purl wise
Bind off stitch by place yarn in front to purl, yarn in back to knit and to bind off.
Knit the first two stitches, lift up the lower stitch over the second stitch of the needle and let the lower loop off. For the next stitch, place yarn in the front of the needle an purl it. Then, move yarn to back in order to bind off. Next stitch is a purl so wrap yarn around needle in front again and purl that stitch, then move the yarn to the back of the needle and lift up the lower stitch over the second stitch of the needle, and let it off.


Block:
Steam block or wet block this garment carefully according to yarn label.
Get ride of moisture: Place the garment in a towel, and wrap it. Carefully press it down to get the excess of water out.
Dry flat: extend the garment on a flat mat where you can pin it or just position it in an original form to keep it with dimensions, and preserving the correct sizing.
Done!!!

Happy knitting!

Blanca

Wednesday, December 16, 2015

Arm Warmers Instructions and Pattern Support


Hello! This is the updated photo from this wonderful event.

First download Pattern Hour Glass Arm Warmers

Materials you need:
yarn, double pointed needles, stitch counter, stitch markers, five labeled needles 1 to 5 (smooth wooden toothpicks work. They are light, shorter than a regular cable needle, and can write for labeling on them with a pen or just removal stitch holders)


The following images are the process on how to construct them:


1. The ribbing and body of the arm warmer just had been worked


2.  Wrist ribbing, and front purl panel are worked


 3.  Finished back purl section


4. Working first cable.  It has been added the two of the labeled cable needles for the first twisted cable


It seems a challenging cable but never impossible. The charts on pattern indicate when should be the needle moved " back and forth"step bu step


6.  Just finished first cable, and just worked round 12 over 26 stitches of chart


7.  Worked 10 rounds after first cable from round 12 to 21 of chart


8. Setting up cable needles for second twisted cable. At this point the five cable needles are placed in round 22 of chart, and then process continue by starting twisting by following pattern. Their position turn vertically because of not room to keep them horizontal as the main RH and LH needles. The image above shows how they look like. If want to work the previous front row of chart panel a little bit loosed, it helps when working these cables


9. Needle cables had been removed as cable has been knitted, and row 23 of panel is done!


10.  Continuation of rounds from 24 to 37


11. Thumb hole had been placed beneath of arm warmer rather than the side. Seven rounds plus nine rounds of ribbing for the rest of arm warmer, had been worked


12.  Stitches of thumb on double point needles had been picked up and worked. A total of 10 rounds including ribbing are finished

All ends had been wave.

I hope these photos can help you to understand how to knit this project.

Happy knitting 😄


XOXO,

Blanca
Saturday, November 28, 2015

Rib & Cable Mitts

Download Free Pattern
Mitts are very handy for the chilly days of the year. Features ribs and cables for an extra warm cushioning feeling. Made in merino wool.
Sizes: One size fits most
Measurements: 5 1/2" diameter, unstretched at the top and 9 1/4" in length
Materials: Knit Picks DK wight (50g/123yds): 1 ball each. I used leftovers(scraps)
Needles: 7 US double pointed
Notions: 3 stitch markers, waste yarn
Photo shown: cornmeal, green tea, peapod, and forest colors

Gauge: In rib stitch 14 sts, and 12 rounds =2"
Over k2, p2 rib (unstretched) you still count the purl stitches even though you can't see them

Tap on photo to load pattern! or Download

Happy Knitting :)


Monday, November 2, 2015

Event in Taiwan

It amazes me  when I am asked from knit along group in Taiwan to use the photo and design of Hour Glass Arm Warmers. The event in Taiwan is called "Taiwan Knit Along" who meets once a month, and host a knit along projects, and for November they will like to knit my design. I am lucky to be part of this beautiful art event!
Fallow them on Facebook https://www.facebook.com/groups/TWNknitalong/


It is great to connect with other enthusiastic knitters as well. Thank you for making me part of you Taiwan Knit Along :)


Cheers,

Blanca

Saturday, October 24, 2015

After Vacation

Hello! I have being away after my vacation since a month ago, and now I want to share with you a few images where my destinations were. I had a great time and happy to meet all my dear family :) there even my grandfather was missing this time. He passed away :(


I had many adventures with everything, especially with the nature, and I enjoyed it! 

Going there, I brought with me a crocheted hat, and a knitted shawl as presents for my aunt and grandmother. I had to make them pretty quickly. I found nice resources which were very helpful for these projects at the last minute https://www.facebook.com/Thepatternfamily & http://www.laylock.org/blog/2012/06/fill-in-the-blanks-shawl-design/


Then, after I came back from my trip, I started to work on many miniature dresses to give to the invited people whom are going to attend the sweet fifteen party. This is an image of them


I also dressed up my miniature doll with same material I made them.


This week was wonderful, I finally have to deliver them tomorrow to my friend's daughter party! It was a wonderful experience making those. Now I started to knit again :) which it is a pleasure.

Have a wonderful time and weekend :)

XO, 

Blanca


Saturday, August 1, 2015

Newborn cardigirl


Tonight I am releasing a newborn garment for a gift! I just had one photo of the knitting process, and one of the finished piece. Yesterday had the opportunity to send it to the baby girl, which finally make me happy! Hopefully she can fit in it because it has been already three weeks since she was born.


Pattern still being written because of matter of prior commitments it has not being released yet. Eventually it will be posted on my rav page. I thought this is a good idea on knitting a quickly and a delicate garment for an infant to use in the warm weather. Made in cotton fibers, which is relatively light. It takes just two balls of Knit Picks -Shine Sport yarn, one of each color. The little cardigan is worked seamless, from bottom-up method. Features a slip stitch texture, and the rest is knitted in a clean stockinette stitch. Finishing it with a garter stitch for neckline, edge of sleeves, and down s that will lay nice. Then sew on three buttons, and snaps to join bands of front sides seams. A super fast and easy project to try for a tiny beautiful creature!

xoxo...Blanca

Saturday, July 25, 2015

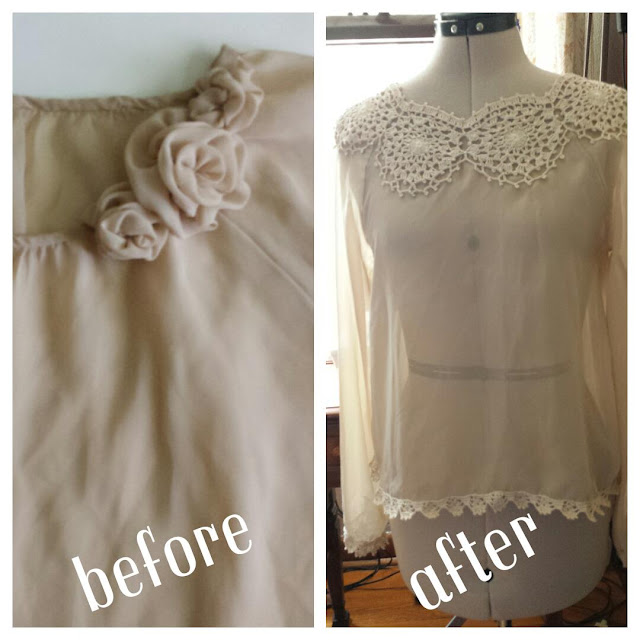
DIY Blouse Crochet Appliqué Refashion


This little project is very fun to make. When I made the blouse with this chiffon fabric I decided to make a simple top with flowers on neck and sleeves with cuffs. I wore it several times but the neck was not enough wide, and it did not stretched so I just thought about to add a crocheted applique. Here are the steps on how to transform it into a pretty delicate piece.

1st. Gather thread and needle to crochet the little motifs to assemble the collar, and laces for sleeves and down edges


2nd. Crochet the laces for hems and neckline


3ed. With a serger fillet the edge of neck after cut out fabric in order to make it wider


4th. Sew on the lace by hand or saw machine  on hems of sleeve. Afterwards, on a mannequin sew the collar on neckline to keep this in place evenly 


5th. Ultimately you want to press laces down with an iron to flatten them. Done! 

Happy weekend :)


Tuesday, July 7, 2015

Socks for my husband

Hello everyone! It has been very busy the past month of June preparing for my vacation this summer but I am continuing with more projects of knitting and crocheting. July is one of the special months in my family life, off course enjoying the spectacle of the 4th of July, and birthdays! yes! Since I started to knit I love to make socks for my husband as many as I can. I thought these linen-cotton socks for his birthday will be a perfect present since the days are warm. He wore them yesterday once he received them on his special day, and he likes them! He says they are very comfortable and cushioning with a smile, and that means a lot to me.


Here are some images of the process on how I knitted them, using a provisional cast on, for an invisible, seamless toe. They were worked from toe-up method:


Well, that's all for now. You all have a wonderful afternoon.

Hugs,

Blanca


Thursday, June 4, 2015

DIY Blouse Lace Refashion

Hello to all. As I mentioned that besides knitting I like to make some of my cloths, too, and also transform some of them into a new look, here is a little project from my wardrobe. It is a sleeveless blouse I bought a year ago. The thing was I liked pretty much the color than everything else. The design was okay, however because I particularly do not like blouses or any kind of garment without sleeves, finally today, I decided to styled it in a different way.

Since I received a lace scarf as a birthday present last year which I loved it so much. It is dressy and airy, especially to wear it on the cool days of summer. Anyways, finding that it matched the same color as the blouse, I decided to repurpose it into adding it for a bit of lace to this blouse.


First of all, this photo is from my sewing station


Here is what I did:

1st. I detached the bottom ruffle from the blouse, which was used for the sleeves

2nd. The lace scarf is attached to the sleeve


3ed. adding another bit of lace from same scarf over sleeves, blouse hem, and lace seamed


Hope this idea on how to redesign a garment from your wardrobe can helps you. You have a great day! and if you like it, please leave a comment on the below box or on the email box. Thank you!

Followers